The overview said the agent proposes and a person decides. This page shows what that looks like at the administrator’s desk, through a series of typical tasks: setting Wingman up, starting a session, checking a server for pending security updates, running a job that takes minutes, using a stored password, keeping the inventory current, and teaching the dashboard which commands no longer need a card. Each task shows what the administrator types, what the agent does, and what the dashboard shows.
Setting up
Wingman builds on secdev
rather than replacing
it: the agent runs in the secdev sandbox, using the local image that
routes every model request to the institute’s own GPUs, and Wingman adds the
service that the agent reaches from inside that sandbox. Setup therefore
assumes a working secdev installation on the administrator’s workstation,
as the secdev workflow
describes, and adds the
Wingman side to it once.
Install Wingman and initialise it
Wingman is a Python program installed as a command-line tool. Its
initcommand writes a configuration directory and points it at the administrator’s existing SSH key, the private half of a key pair. Wingman assumes that every server it will administer already trusts that key, so that the administrator can log into each of them without a password today; Wingman adds no access and distributes no key, it only uses the one the administrator has. The following commands clone the repository, install the tool with the Python installeruv, and initialise it:git clone \ https://github.tik.uni-stuttgart.de/ac114192/itp3wingman cd itp3wingman uv tool install . itp3wingman init --identity-file ~/.ssh/id_ed25519 itp3wingman check-configThe
check-configstep refuses an encrypted key (Wingman cannot prompt for a passphrase) and refuses configuration files that other users can read.initalso prints the paths thatsecdevneeds in the next step: the socket (a local file through which the agent talks to Wingman), a token and a signing key.Wire
secdevto the serviceThe agent reaches Wingman only because
secdevis told where the service is. Two sections in thesecdevconfiguration file do that, with the paths thatinitprinted:# ~/.config/secdev/config.toml [runtime.opencode] system_prompt_file = "~/.config/itp3wingman/wingman-system-prompt.md" [runtime.mcp.wingman] socket = "/run/user/1000/itp3wingman/mcp.sock" token_file = "~/.config/itp3wingman/mcp-token" workspace_signing_key_file = "~/.config/itp3wingman/workspace-key" background_completion_wake = trueThe first section mounts Wingman’s instructions for the agent into the container, so that OpenCode, the coding agent used here, starts with a
wingmanprofile that carries them. The second connects the agent’s tools to the service: the socket is the local channel to Wingman, the token proves to Wingman that the caller is thissecdev, the signing key binds the agent’s file transfers and history searches to its own project folder (the workspace), and the last line letssecdevwake the agent when a long-running job finishes. The Technical Details page explains each of these.Describe the machines
Wingman only ever talks to a server that appears in its master data: a YAML file listing each host by a short name, with its address, login user and whatever notes help an agent reason about it. Nothing that is not in this file is a valid target — a host name the agent invents is refused before any network activity.
version: 1
hosts:
  storage-01:
    address: storage-01.example.invalid
    user: admin
    icon: storage
    tags: [storage, backup]
    metadata:
      role: file server
      os: Debian 13
      expected_services: [ssh, nfs, smb]
networks:
  institute: "the management network, see firewall notes"
Everything outside
hostsis free-form reference material for the agent: networks, name servers, contacts, firewall notes. Secrets never go here; the agent reads this file.The file is a starting point, not a burden to keep by hand. The agent has tools of its own for proposing a change to the file: one to add an entry, one to modify a value and one to remove an entry. When the agent notices on a host that the record is wrong or incomplete — a newer operating system, a service that is no longer there, a disk that was added — it calls one of those tools, and the proposal opens a card in the dashboard like any other request. Nothing changes in the file until the administrator approves the card, so the inventory evolves with the machines under the same control as the commands; the section on keeping master data current shows an example.
Add the risk model
Before the service starts for the first time, install the model that rates every waiting command for the administrator: a small open classifier for shell commands, LANCET Nano [1], that runs on the workstation without a network connection. One command installs the model and one setting switches the risk mark on:
itp3wingman install-model
# then set assessment.enabled: true in Wingman's own config.yaml
The service log later reports
Risk assessment readyonce the model has loaded. From then on every card that waits for a decision carries a risk mark: the model reads the command text and rates how destructive the command could be, green for one that only reads, orange for one worth a closer look, red for one that could delete data or break a system. The mark makes no decision. It tells the administrator where to look twice; approving or declining remains the administrator’s choice on every card, and a green mark approves nothing.Install the service
Wingman runs as a user service, a background program that starts with the administrator’s login session. The repository ships the unit file, the description that systemd, the Linux service manager, uses to run it; the following commands install it and start the service now and at every login:
mkdir -p ~/.config/systemd/user
cp systemd/itp3wingman.service ~/.config/systemd/user/
systemctl --user daemon-reload
systemctl --user enable --now itp3wingman.service
The dashboard is reachable only from a browser on the same machine, at
http://127.0.0.1:9402by default. A shell alias opens it in the browser’s app mode, a window without tabs or address bar, detached from the terminal:# in ~/.bashrc, for the default port alias wingman='setsid -f chromium --app=http://127.0.0.1:9402 \ >/dev/null 2>&1'
Starting a session
Setup is done once; a working session starts with two applications side by
side on the workstation. One is the dashboard in a browser, where the
administrator decides. The other is the agent in a secdev sandbox, where
the requests come from. The service itself needs no start, since it has been
running since login.
Open the dashboard
Open the dashboard with the alias from setup and keep the window beside the terminal:
wingmanRight after the first start the dashboard is empty, since no agent has asked for anything yet:
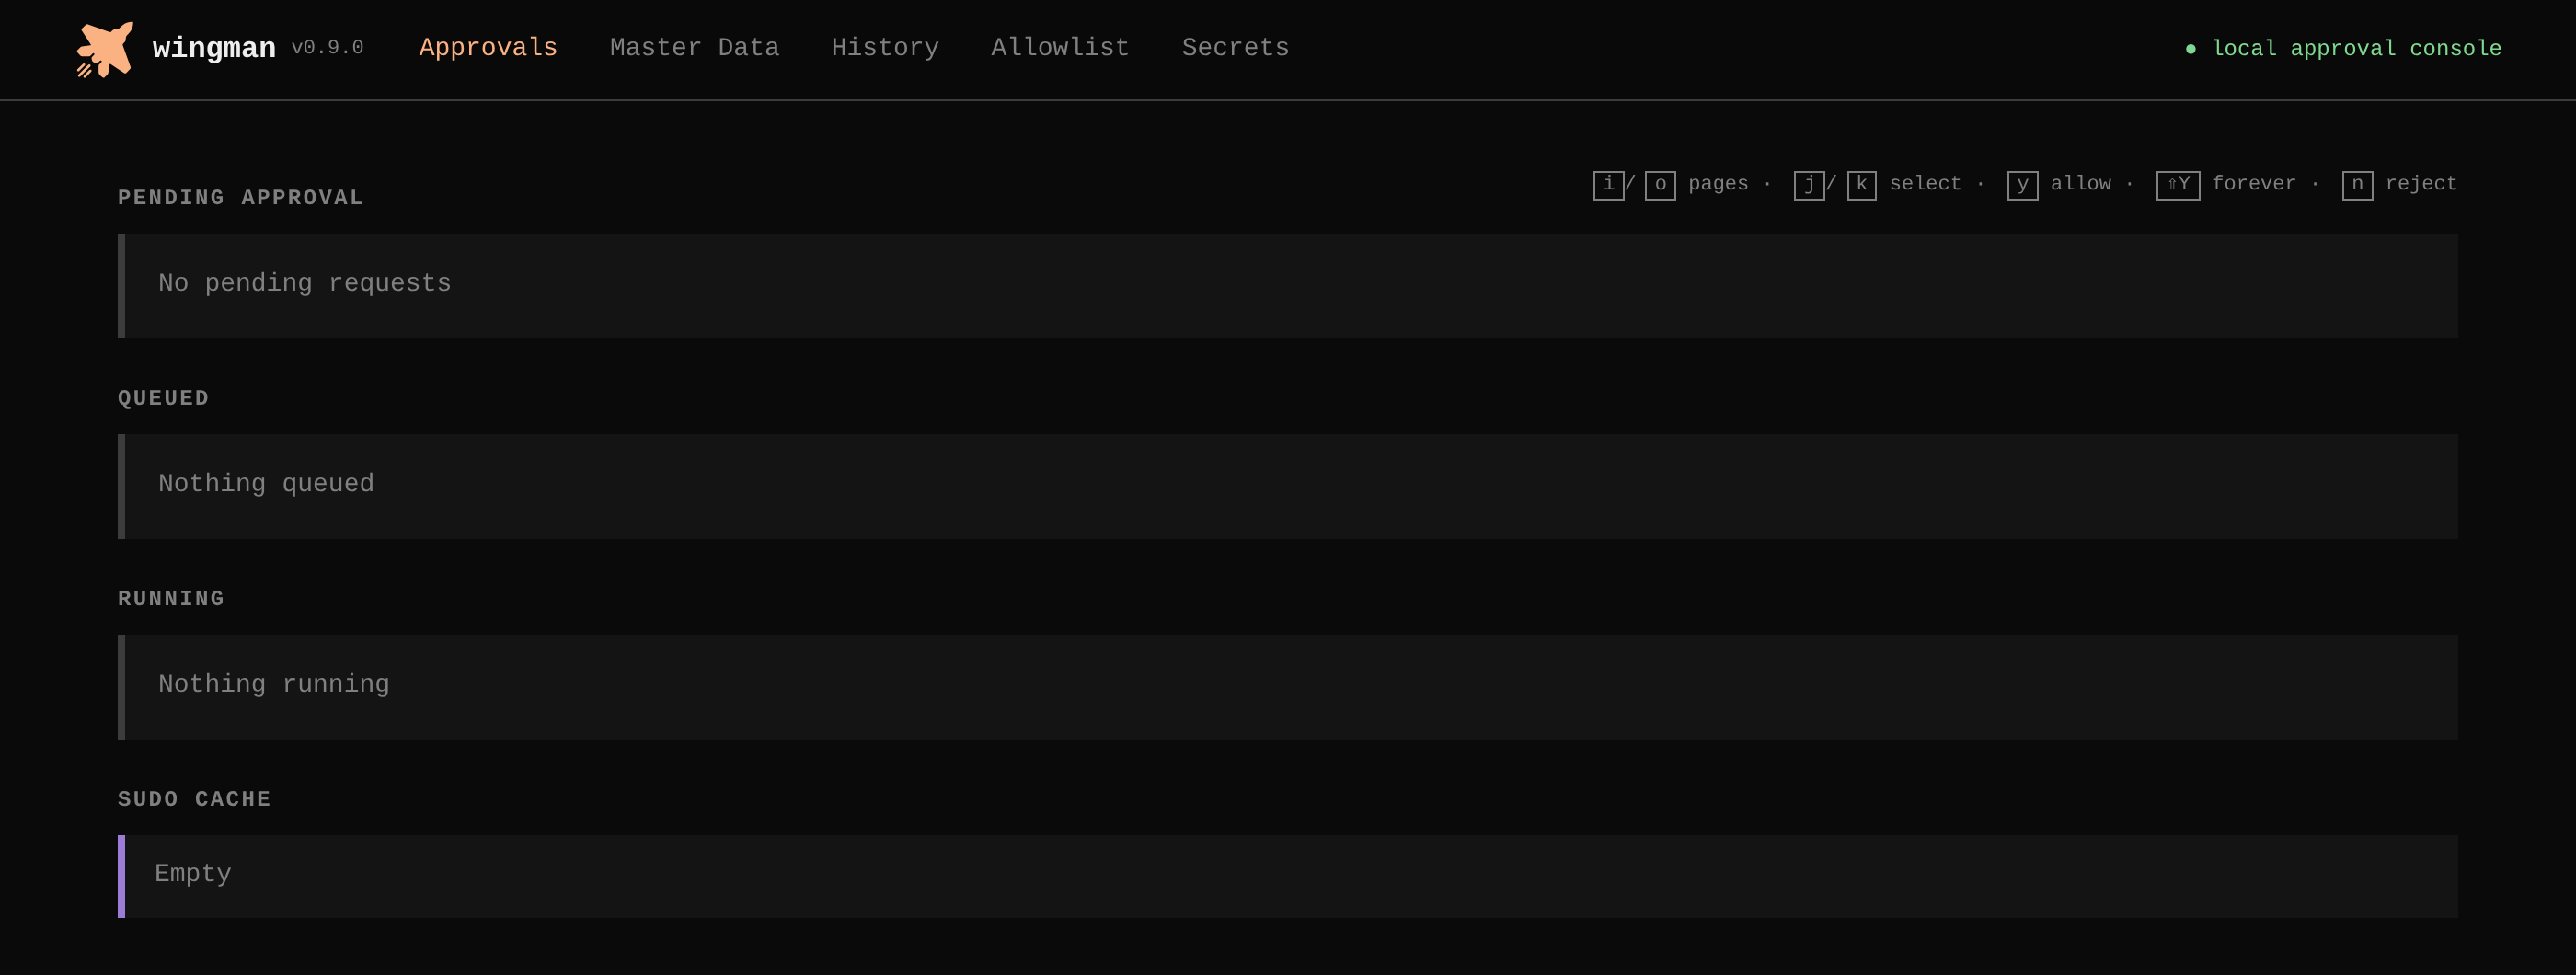 (enlarge)
The dashboard right after the first start. The Approvals page lists what waits for a decision, nothing yet; the other pages are a click away in the bar at the top. The bar at the top of the dashboard has five pages:
- Approvals shows every request that waits for a decision, with the running and queued jobs below it. Nearly all of a session happens here.
- Master Data shows the inventory of hosts and the reference material the agent reads, as cards.
- History records every request and its ending, with secrets removed.
- Allowlist lists the programs that may run without asking, both the configured rules and the ones the administrator allowed for good from a card, each with a Revoke button.
- Secrets holds the stored service passwords that the section on using a stored password describes.
When a request is waiting, the Approvals label pulses orange on every other page.
Start the agent
The agent runs in the secdev sandbox, using the
localimage that routes the model requests to the institute’s own GPUs. Start it in an empty project folder — that folder becomes the workspace, the only place on the administrator’s machine the agent can read or write files.mkdir -p ~/admin ~/admin-skills && cd ~/admin # mount the administrator's own skills alongside secdev local --skills ~/admin-skills # inside the container, unattended mode: opencodedOpenCode, the coding agent used here, starts with the
wingmanprofile pre-selected that already carries Wingman’s instructions and its tools. Thedsuffix starts the unattended mode the secdev workflow introduced, in which the agent does not stop to ask inside the sandbox, because every consequential step is approved in the dashboard anyway. The second directory holds the administrator’s own skills, the written procedures for this institute’s servers, whichsecdevmounts read-only into every session so they are available alongside the bundled ones.Before giving the agent its first task, check that the agent can reach Wingman. OpenCode’s footer counts the connected MCP servers, and the
/statuscommand names them; the entrywingmanmust read Connected. Without that connection the agent has no tools for the servers and can only talk. The following screenshot shows a fresh session with the check done: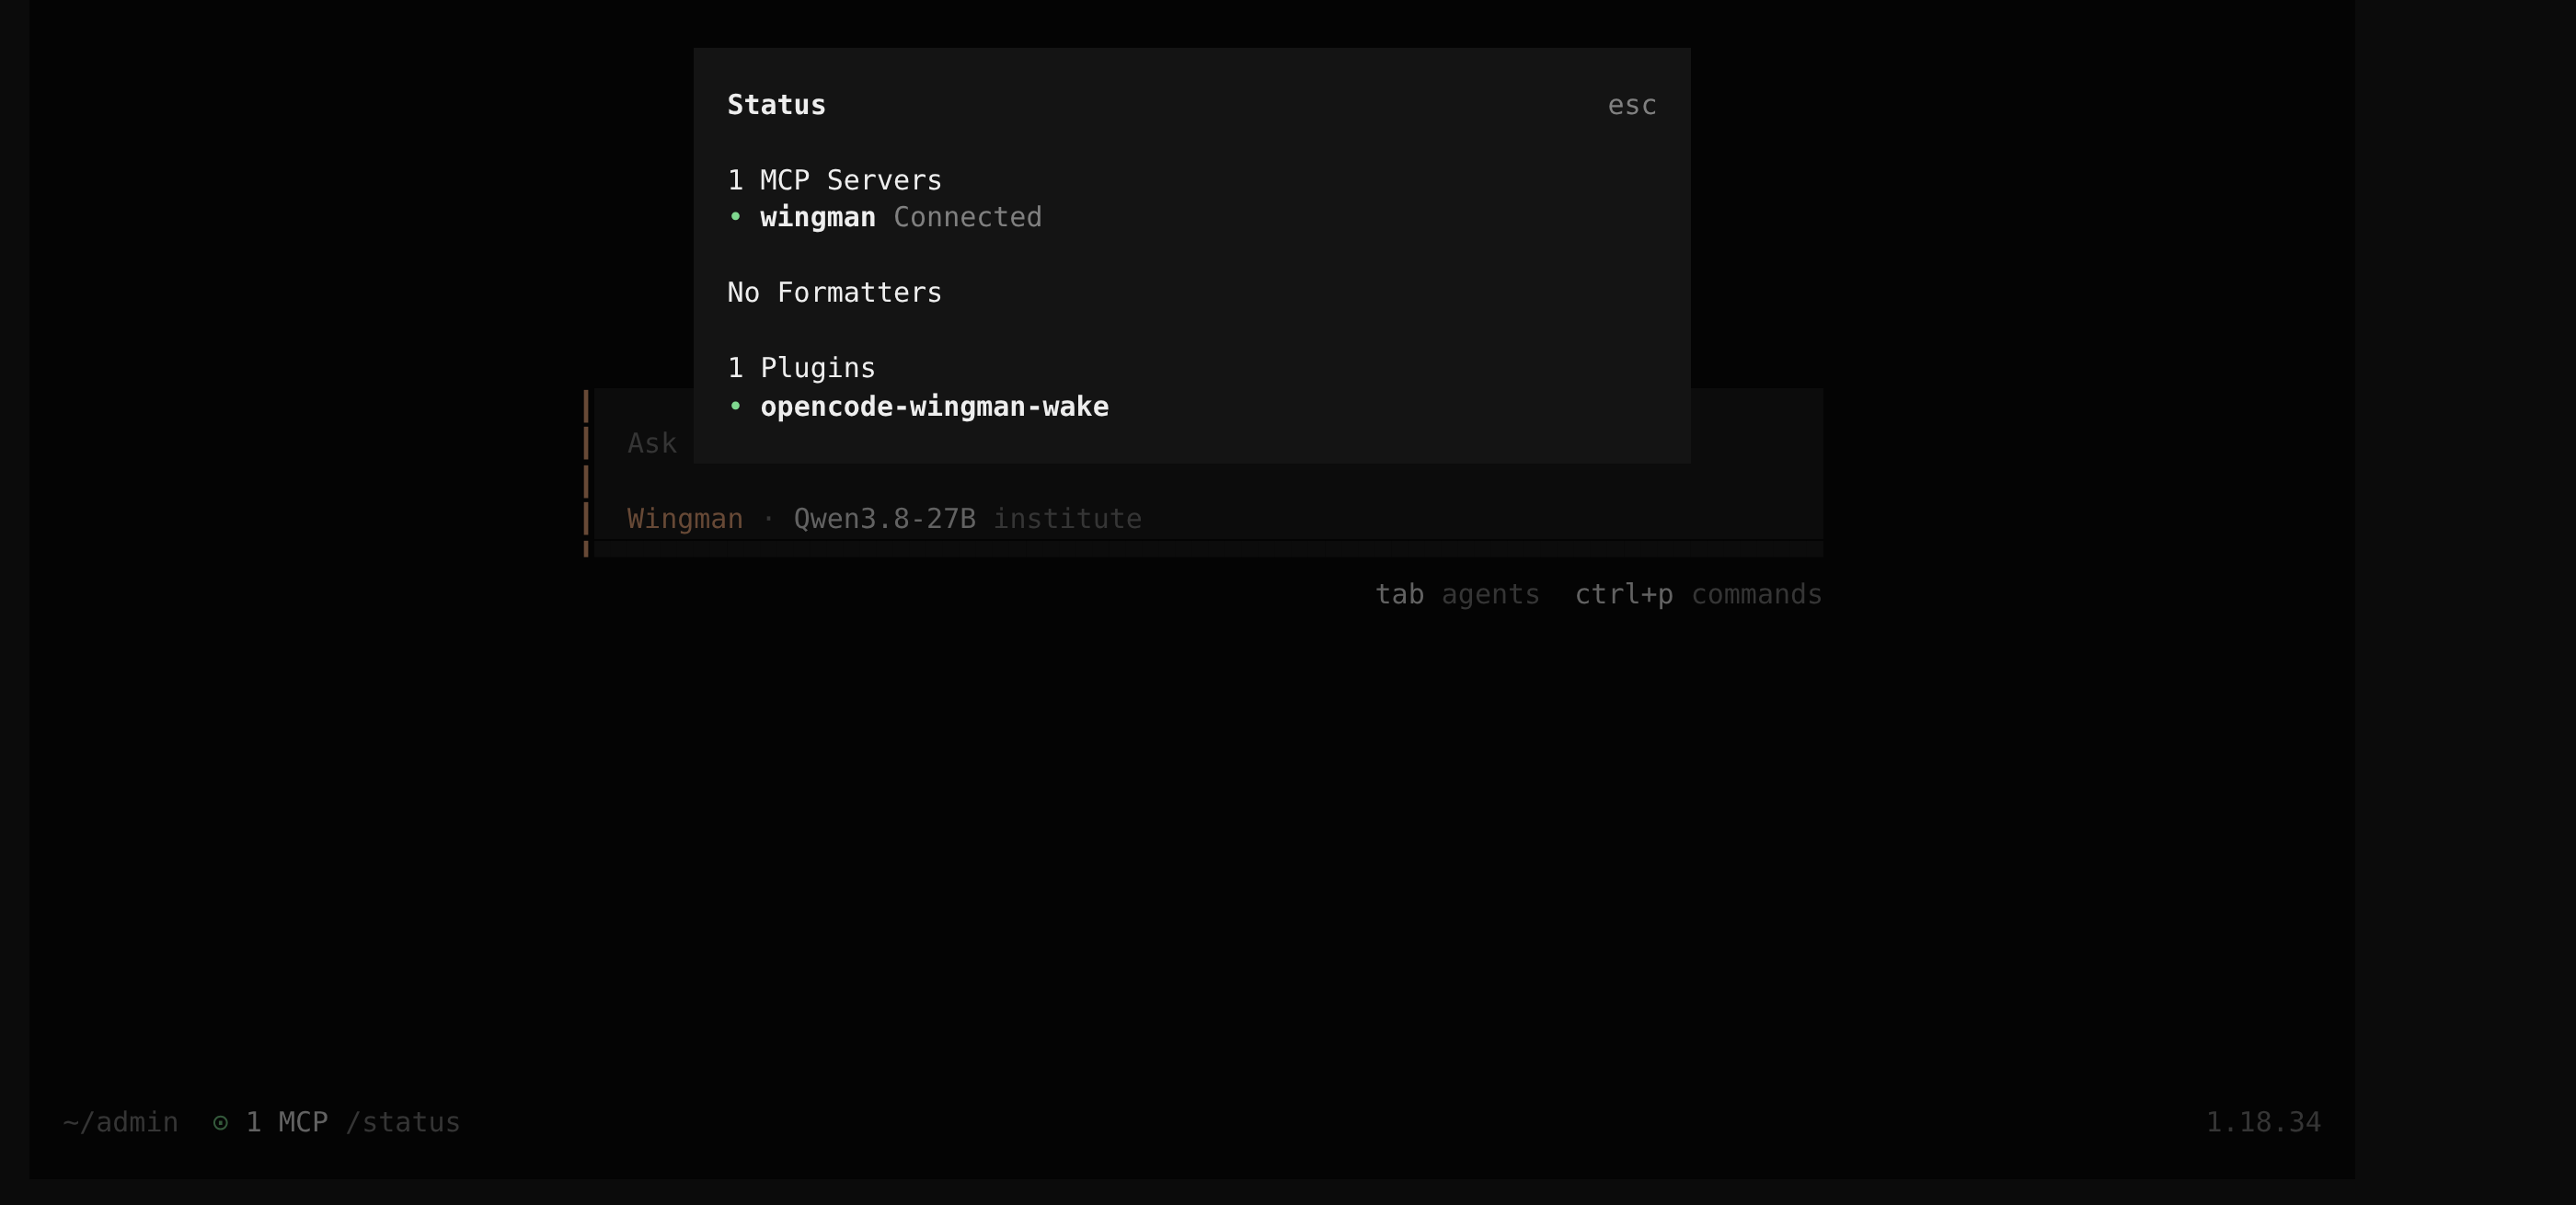 (enlarge)
A fresh agent session. The status dialog confirms that the Wingman tools are connected, and the prompt shows the Wingman agent with a local model.
Doing a task
With Wingman running, a task is a conversation with the agent and a series of decisions in the dashboard. The running example is a check for pending security updates on a storage server.
Ask for an outcome, not a command
Describe the goal, not the commands, as in this prompt:
Prompt to the agent:Check whether the storage server has pending security updates and report.
The agent first looks the host up in master data, because that is where valid names come from. Then it composes the commands it needs and submits each one with a one-line reason.
Read the request in the dashboard
A card appears on the Approvals page. It shows, from top to bottom, a row of badges (whether root is requested, the classification explained under Under the hood below, and the host with its icon), the agent’s reason, the exact command, a password field when root is requested, the list of programs the command runs, and a Command risk bar when the risk model is installed. For this task the first request is a package index refresh that needs root, and the following screenshot shows its card:
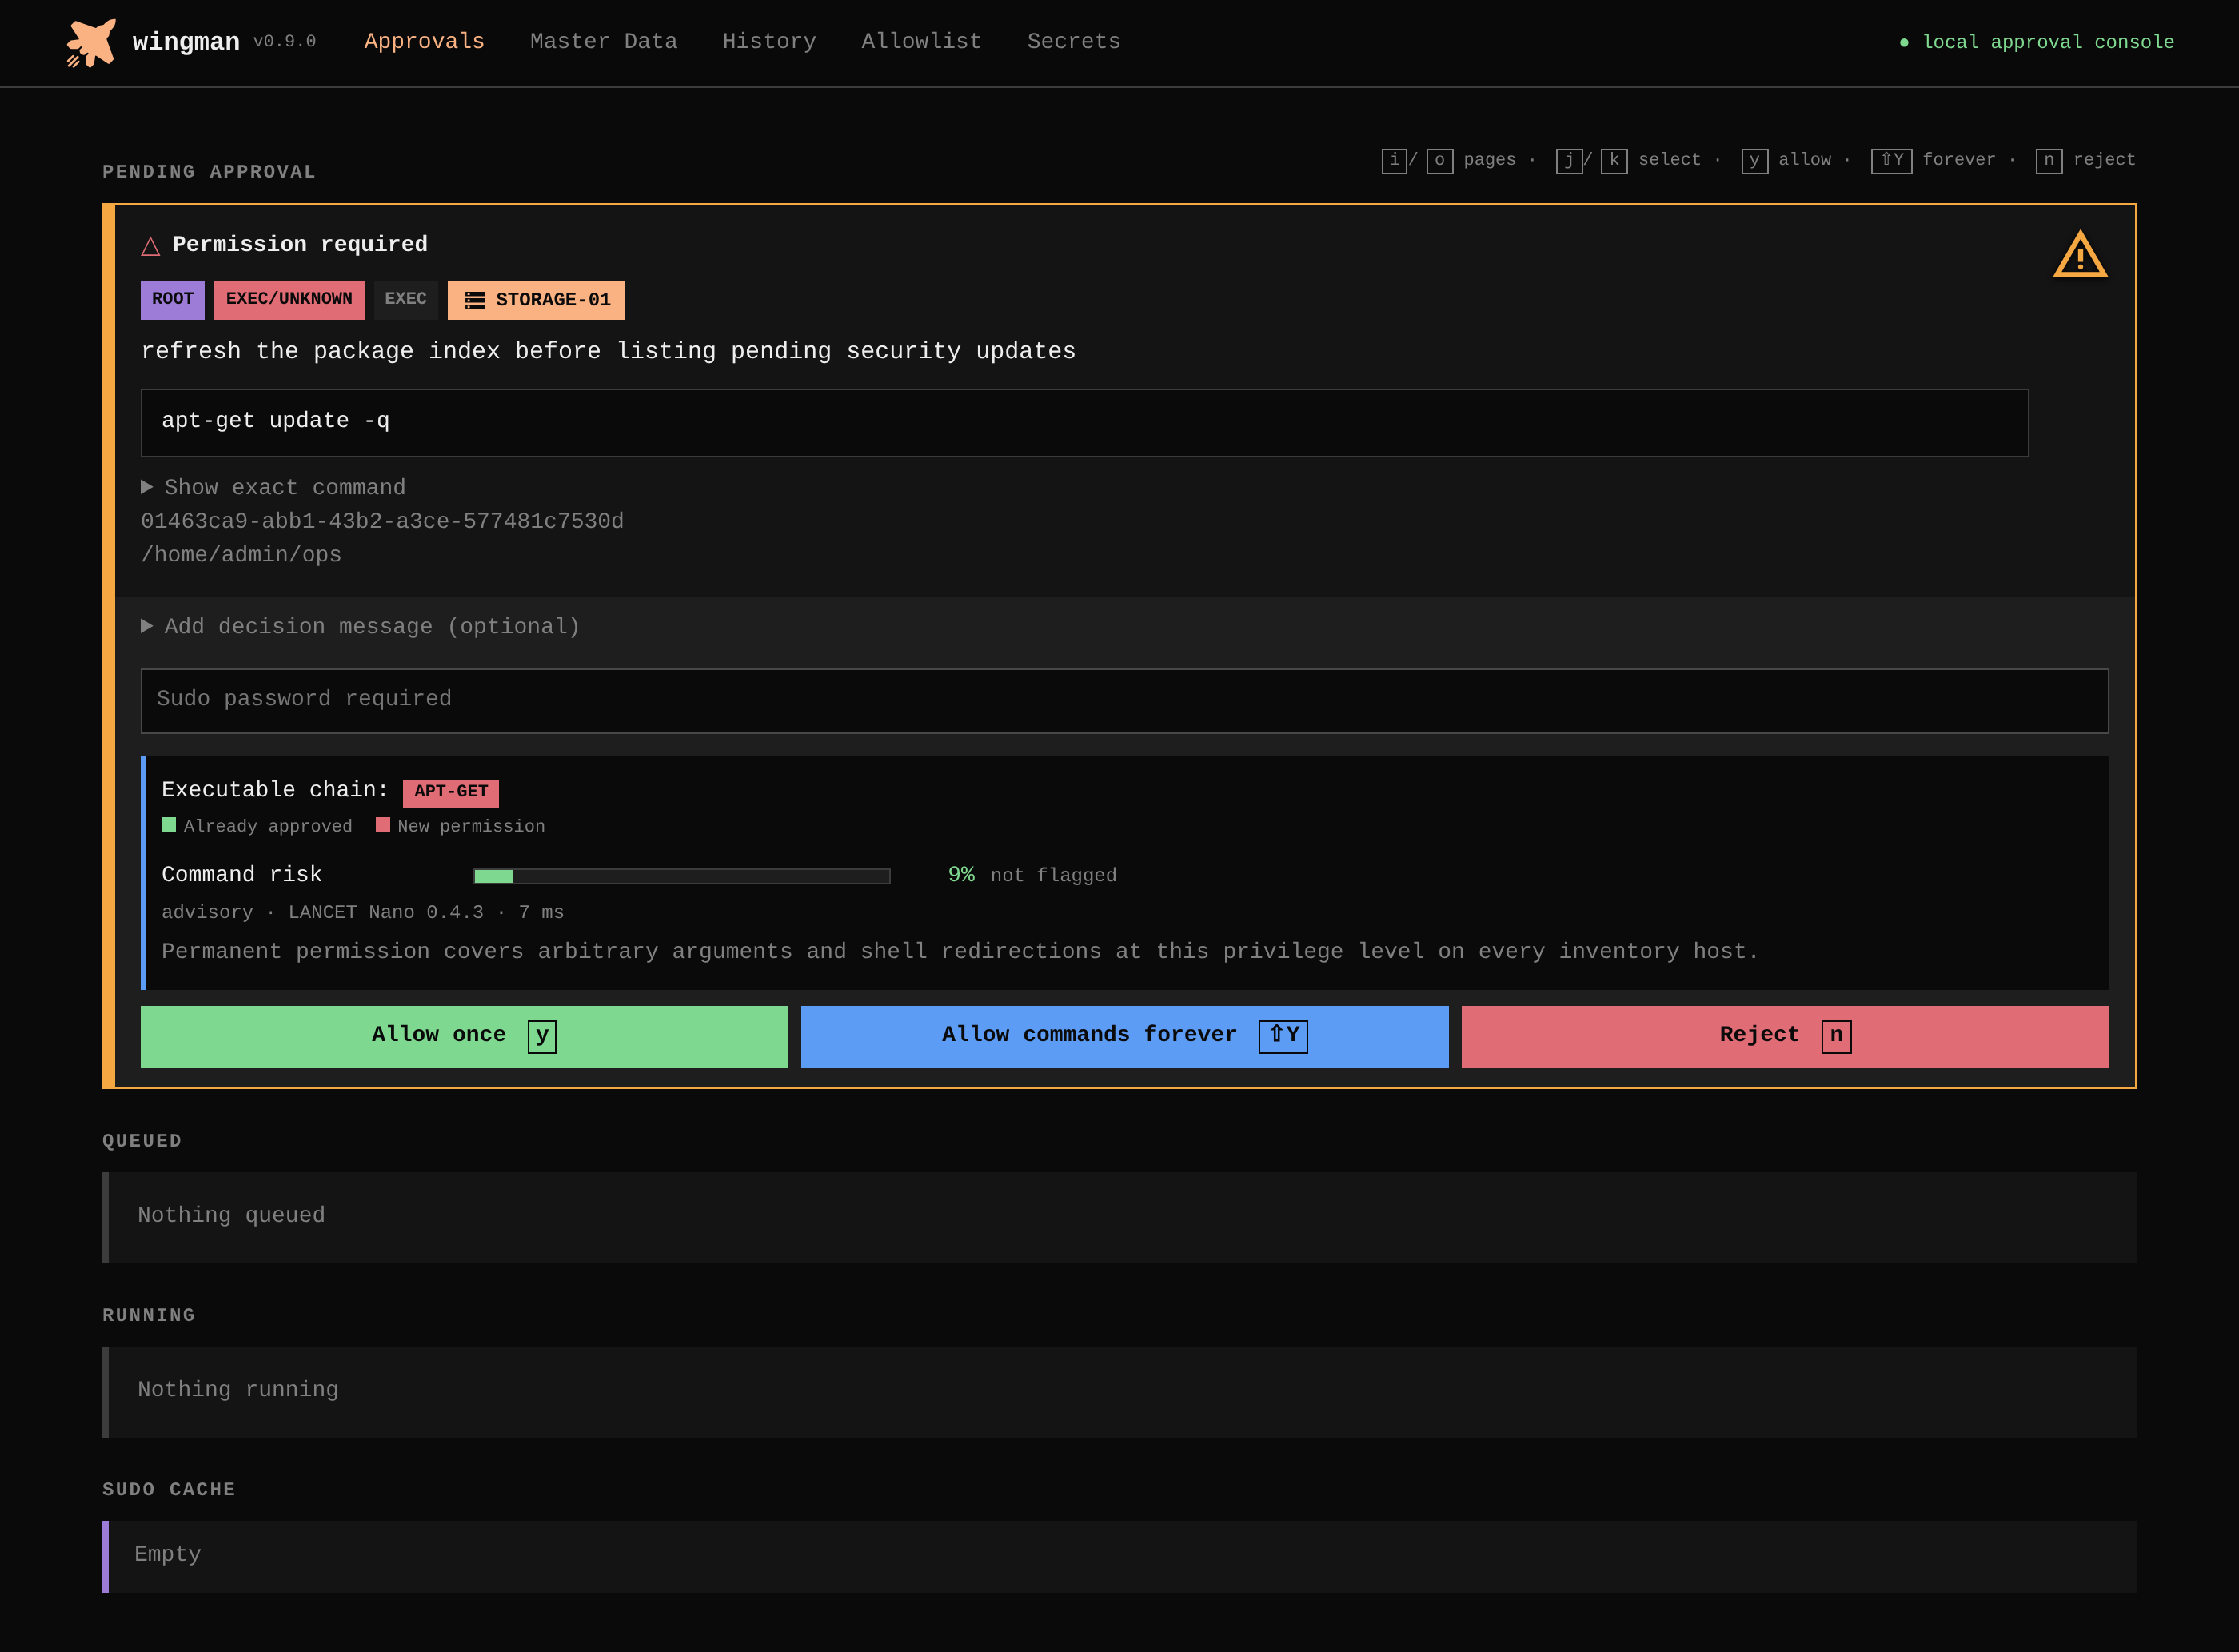 (enlarge)
One card shows the target, privilege, command, classification and reason before approval. The risk bar gives the model’s verdict in colour:
not flaggedis green,revieworange, andriskyred and blinking. The risk model ratesapt-get update -qat 9 % and leaves it unflagged. To give a feeling for the scale, two commands that could have been requested instead: the model ratessystemctl stop postgresql33 %reviewandrm -rf /var/lib/postgresql99 %risky. The verdict is a hint for the person reading the card. It never approves or refuses anything.Because the command needs root, the card asks for the server’s sudo password in the password field below the command. The administrator types the password into the dashboard; Wingman supplies it to
sudoover the SSH connection it opens for the approved command, and the agent never sees it. Wingman keeps the password in memory only, for one hour by default, so the next root commands on that host run without a prompt. The Sudo cache section at the bottom of the Approvals page lists the cached passwords with a button to clear each, and the host label on every card fades from white to grey as the cached password expires.The three buttons at the bottom of the card are the decision. Allow once runs this request and nothing else. Allow commands forever runs it and also remembers every program the command calls, so that later commands made of those programs run without a card; the section on the learned allow list explains what that permission covers. Reject declines, with an optional note to the agent. Each button names its key, and the legend at the top of the page lists the keys that move between cards and pages, so nothing needs the mouse.
Allow once, allow for good, or decline
For
apt-get updatethe answer isy, the key for Allow once: it is harmless, but it is not a command to pre-approve for every host as root. The agent receives the exit code and output and sends the next request:storage-01 ROOT exec/unknown apt-get -s upgrade | grep -i security Reason: simulate the upgrade and list packages from the security repositoryAgain
y. The-smakes it a dry run; the agent noted that in the reason, and the administrator checks it.A decline can carry a note. “Use
apt list --upgradableinstead” reaches the agent as part of the result, and the agent adjusts its plan.Find the output in the history
The output of an approved command goes two ways. The agent receives it as the result of its tool call, which is how the agent learns what it asked for. Wingman also writes it, with the request and its ending, into the history, which the History page of the dashboard shows: one row per request with its time, host, command and status, and behind each row the complete record, with the reason, the decision, the exit code and the command’s output. Declined requests are there too, with the administrator’s note. The following screenshot shows the record of the dry-run upgrade, opened to its output:
 (enlarge)
Every request ends in the history. The expanded record holds the output that the agent received, with secrets removed. Read the report
The agent answers in the chat with what it found — which packages are pending, from which repository, whether a reboot would be needed — and, if the task calls for it, writes a dated report file into the workspace. It does not install anything: that was not asked, and it would be a separate request on a separate card.
The next prompt in the same conversation can ask for exactly that:
Prompt to the agent:Install the pending security updates and restart the affected services. Tell me if a reboot is needed.
The installation then arrives as a root request on a card like the ones before, followed by the checks the agent runs to verify that the services are back, and the administrator decides each one.
Long-running work
Some administrative jobs take minutes rather than seconds — a full security
collection, a large backup check, a package verification. The agent starts
those with a different tool, start_on_host, which returns a request ID at once
instead of waiting. The job runs in the background, and the Approvals page
shows its live output while it runs, with a button to cancel it. The following
screenshot shows a running backup check:
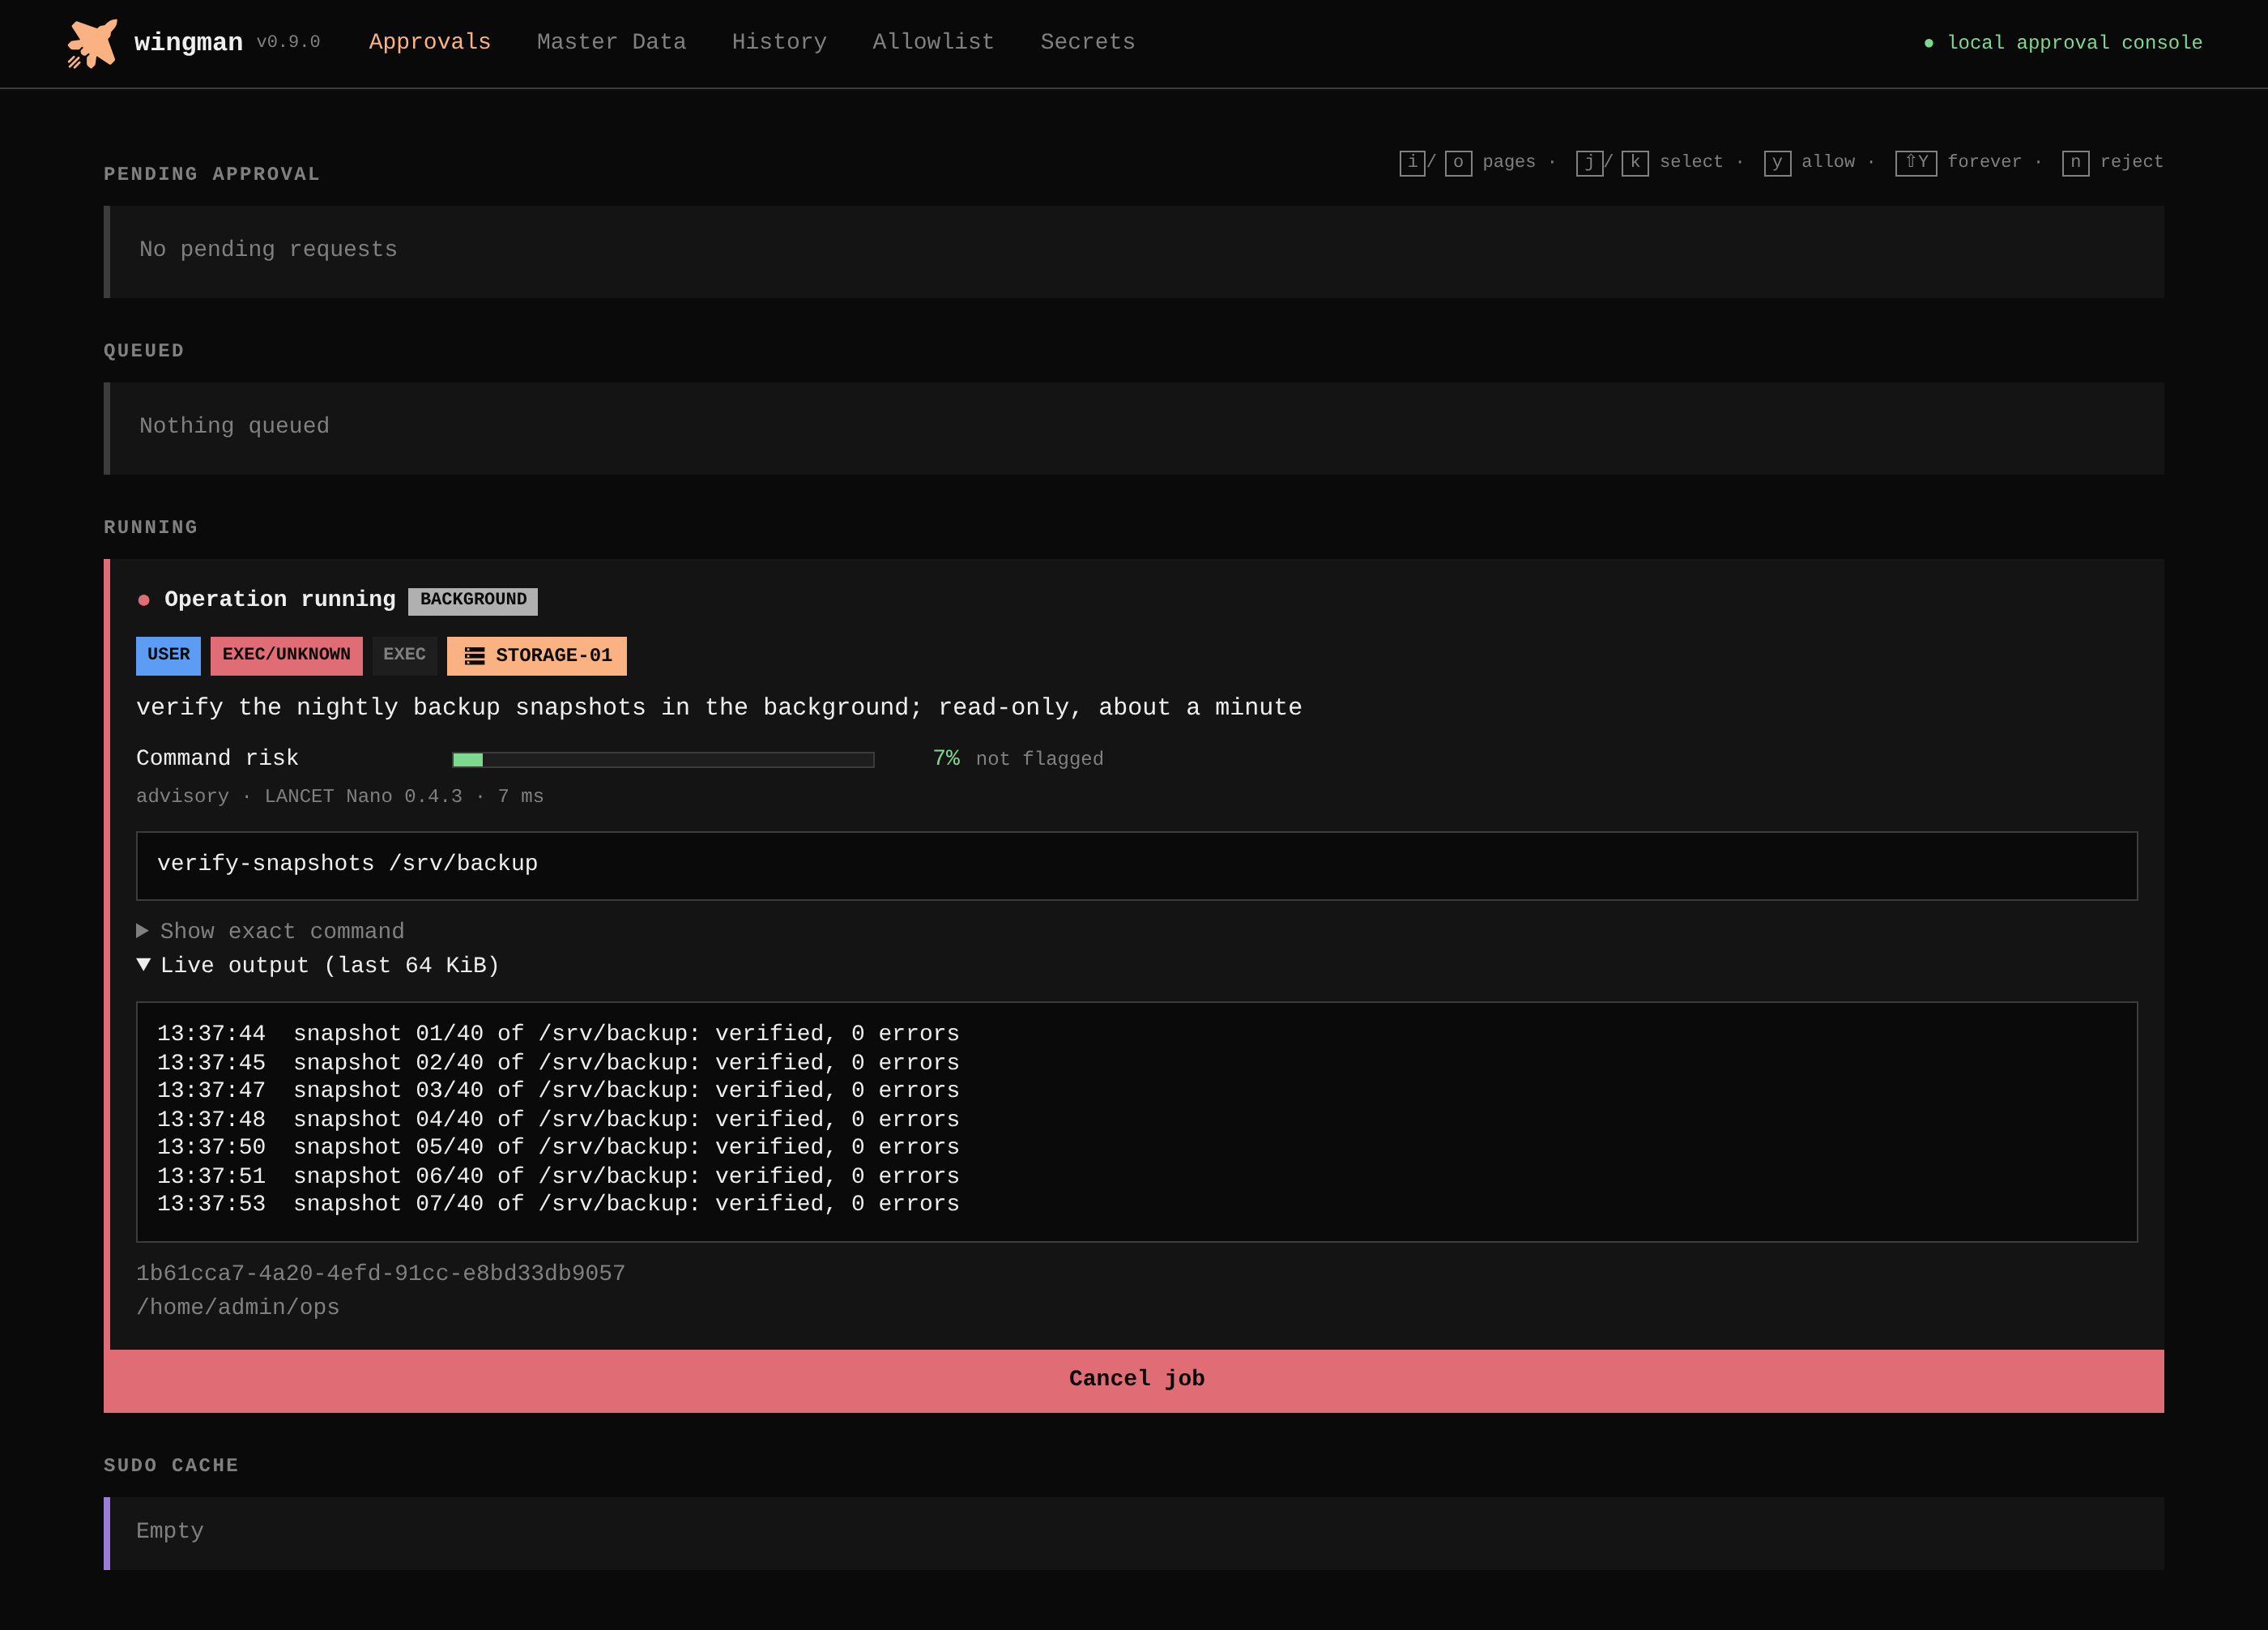 (enlarge)
When the job finishes, a plugin that secdev installs in OpenCode wakes
the agent’s session with the request ID and the final status, and the agent
fetches the result. The agent does not wait for the job itself: its
instructions tell it to end its turn after starting one, because the wake-up
reaches the agent only while its session is idle. The administrator can
cancel a running job from the dashboard at any time; the agent can cancel
one only through a cancellation request that itself needs approval.
Using a stored password
Some tasks need an account password: a database superuser, an API token, the
login of a management interface. Pasting the password into the chat would hand
it to the agent and leave it in the conversation. Instead the administrator
stores it in Wingman’s vault, an encrypted file that only the dashboard opens,
and the agent refers to it by name. The running example checks the replication
status of a database server, db-01, which needs the PostgreSQL superuser password.
Create the vault and store the password
The Secrets page creates the vault on first use. The administrator chooses a passphrase, which encrypts every stored password and cannot be recovered, and then adds an entry: a name such as
db-admin, the usernamepostgres, the password, the hostdb-01it belongs to, and a description of what the account is for. The following figure shows the page with one entry: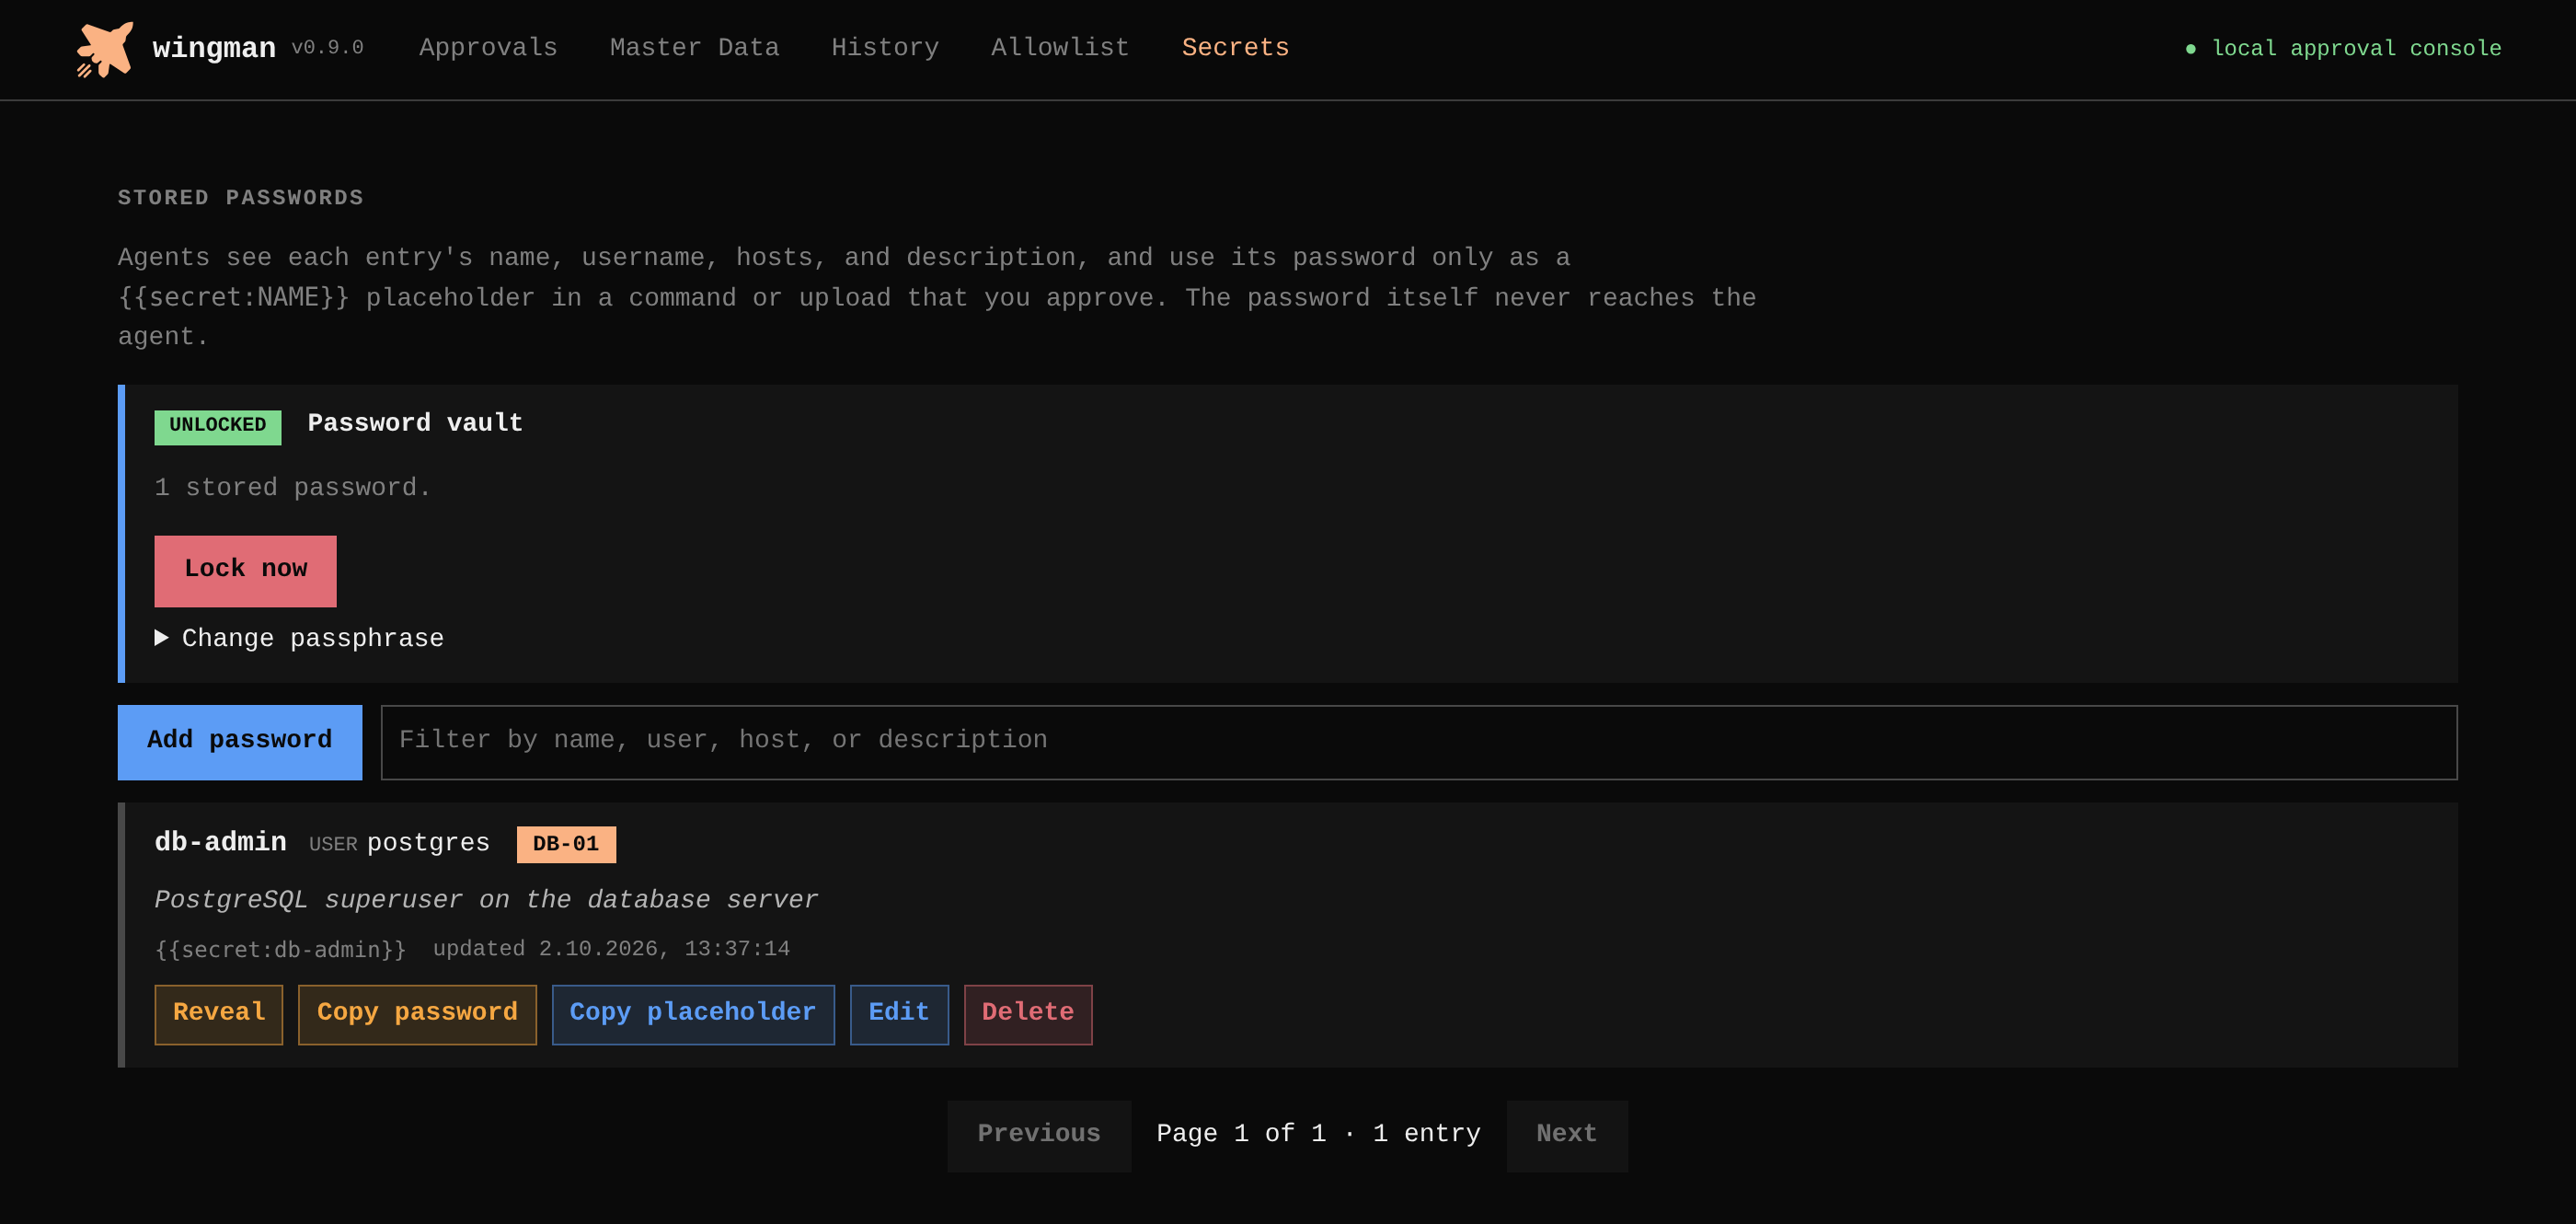 (enlarge)
Each entry links a password to the hosts it is valid on. The page can reveal or copy a password; nothing else can. After every restart of the Wingman service the vault is locked again, and the administrator unlocks it on the same page with the passphrase. While a vault that holds passwords is locked, every remote request waits on its card, even one a policy rule would allow, because Wingman cannot remove passwords from output it cannot recognise.
Let the agent find the entry
The task is phrased as before, as an outcome:
Prompt to the agent:Check the replication status of the database on db-01.
The agent calls
list_secrets, which returns each entry’s name, username, hosts, description and placeholder, never the password. It findsdb-adminand writes the placeholder{{secret:db-admin}}where the password belongs:db-01 USER exec/unknown PGPASSWORD="{{secret:db-admin}}" psql -U postgres \ -c "SELECT client_addr, state FROM pg_stat_replication" Reason: read the replication state with the superuser account Command risk ██░░░░░░░░ 19% not flaggedA placeholder works only on the hosts its entry lists, here
db-01.Read the card and approve
The card names every stored password the command uses, with its username and description, and says that only literal copies of a password are removed from output. The decision is the same as for any card, with one difference: a command that uses a stored password always waits for a person, so the card offers no permanent approval. The following figure shows such a card:
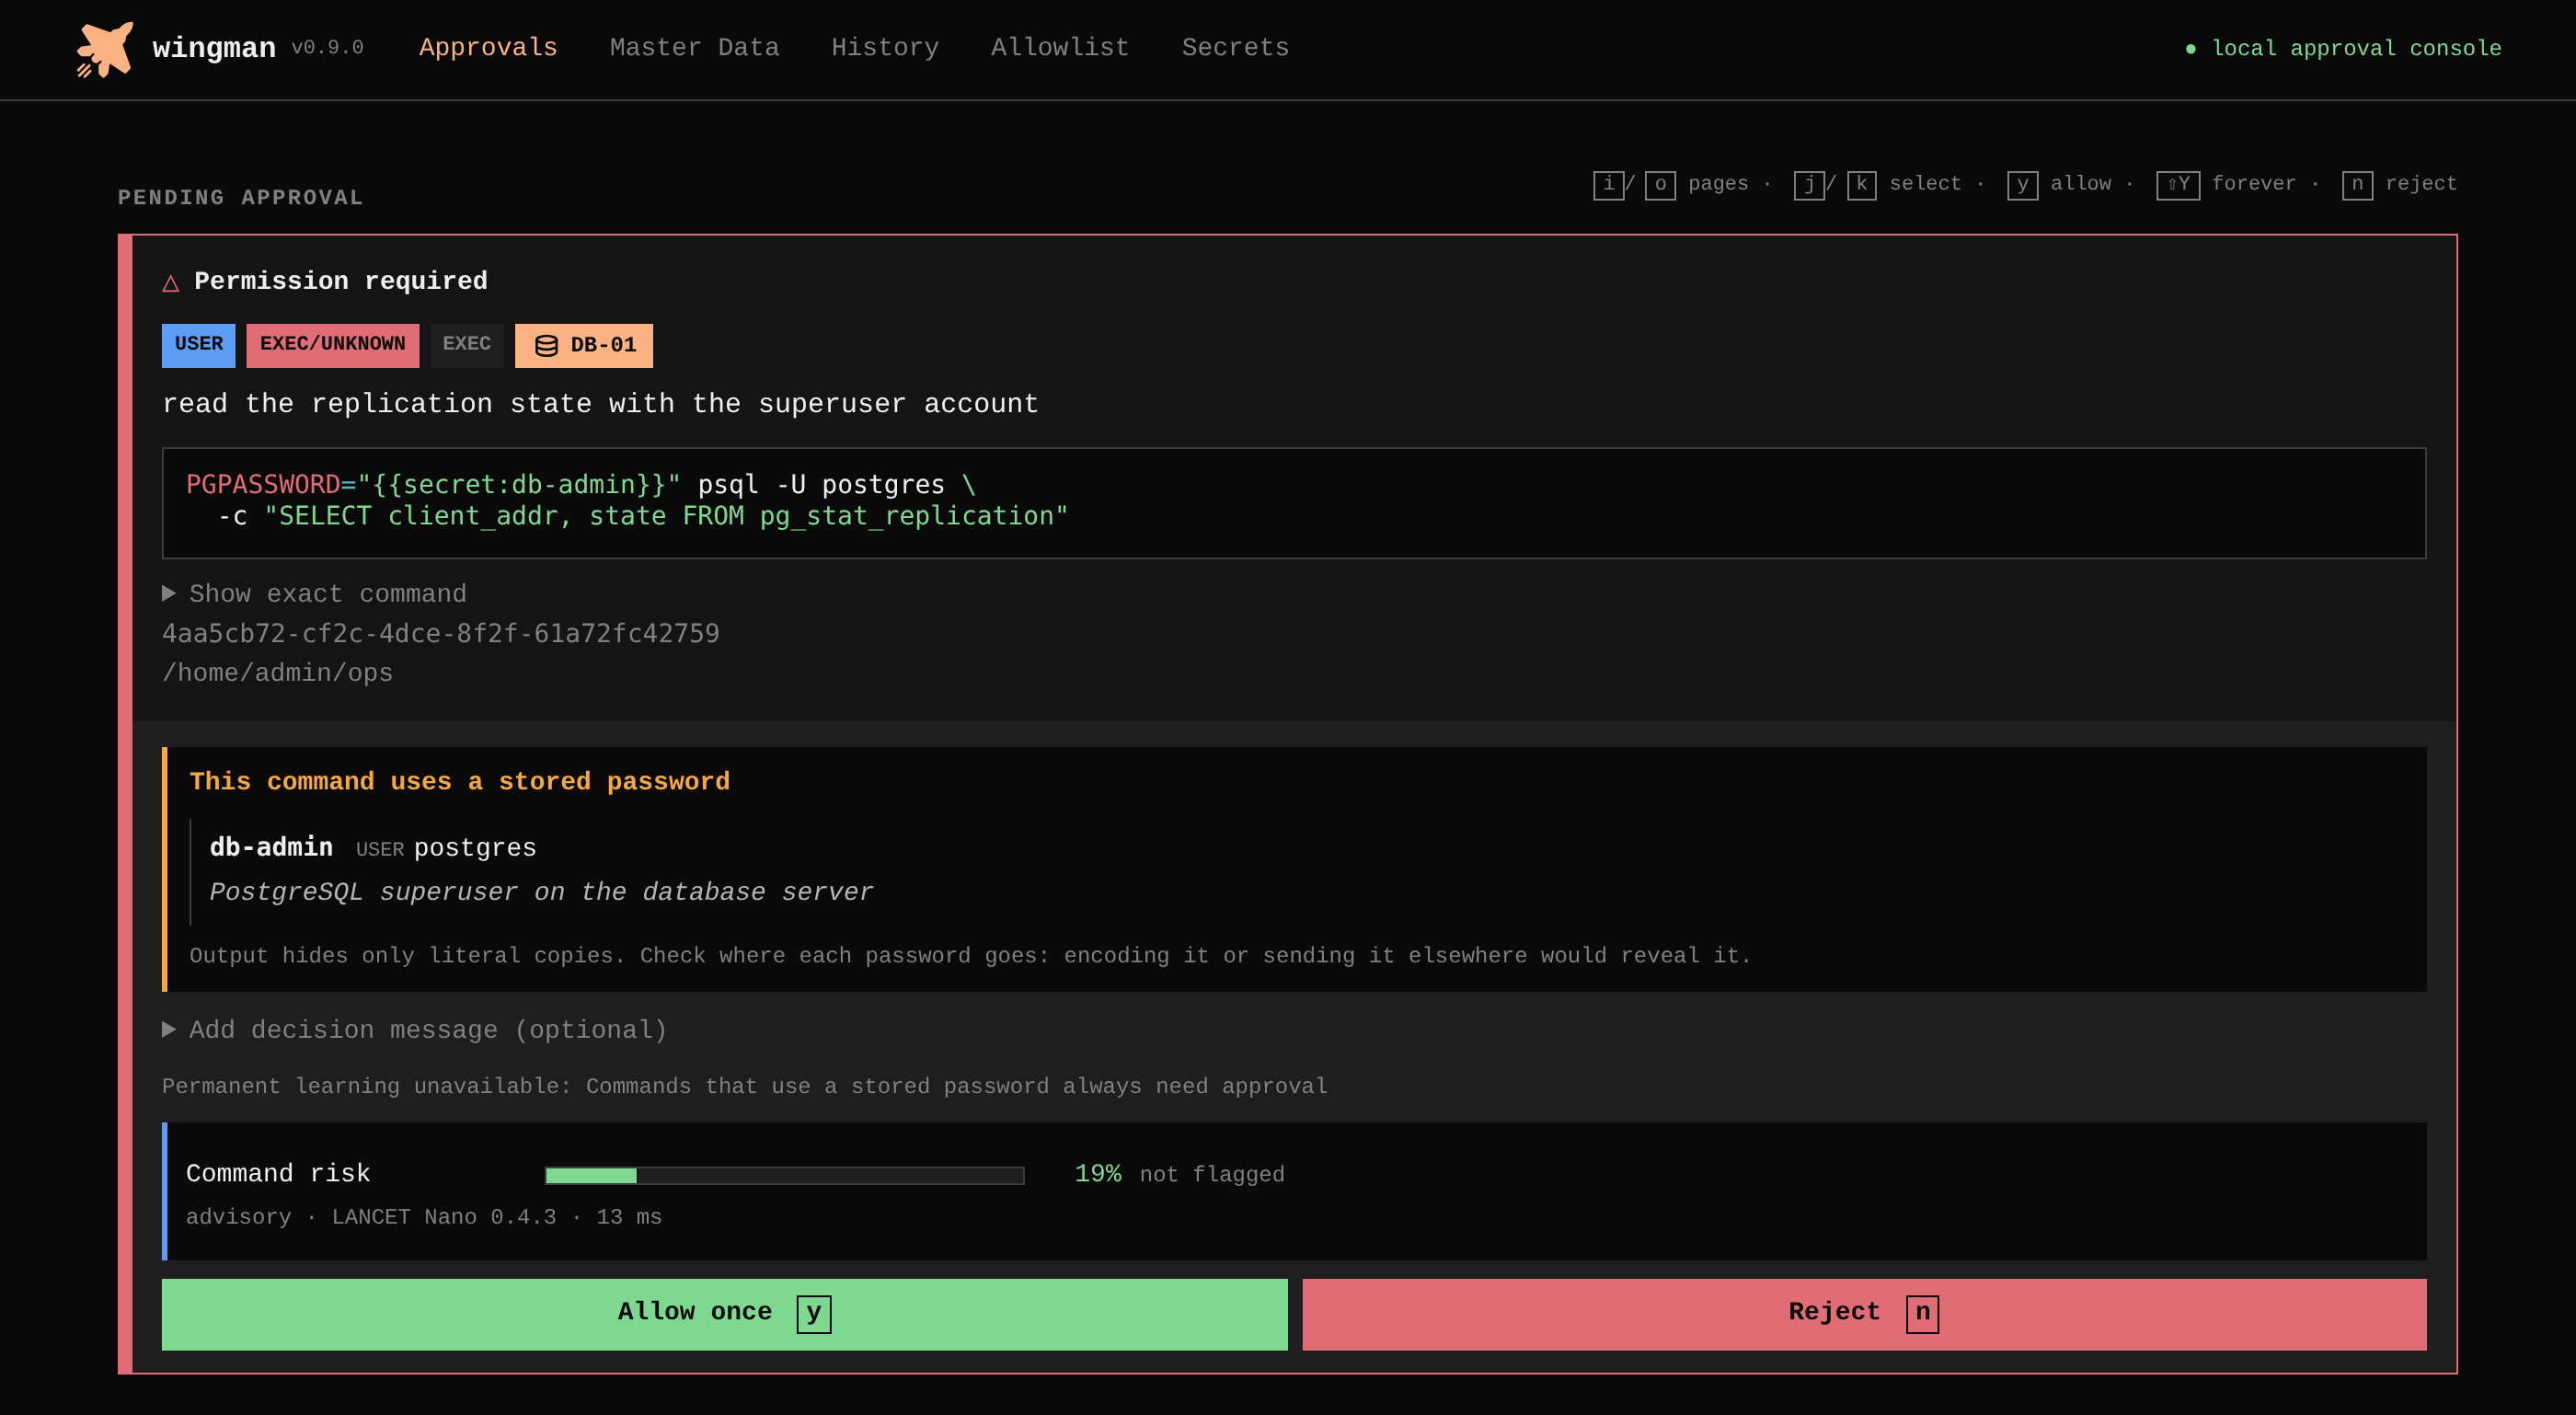 (enlarge)
The card shows which password the command will use before the person decides. Read the result
After approval, Wingman sends the password to the host over the encrypted SSH connection, outside the command line. The result reaches the agent as usual, except that a stored password anywhere in the output reads[REDACTED:secret:db-admin]. The history keeps the command with its placeholder, so the record shows which password was used without containing it.
The same placeholder works inside a file the agent uploads, a configuration
file that needs the database password for example. The agent writes the file
with {{secret:db-admin}} in it and asks for the upload with secrets=true;
Wingman fills the password in on the way to the host. A file on a host that
contains a stored password cannot be downloaded into the workspace, because
the download would hand the password to the agent.
Keeping master data current
Master data is where the agent starts every task, and it is only useful while it is true. The agent maintains the file: when what it sees on a host contradicts the record, it proposes the correction.
The proposal is a request like any other. It names the exact field, the old and the new value, and the reason, and it opens a card in the dashboard that shows the change as a before/after preview. Neither a policy rule nor a permanent approval can pre-approve such a card; every change to the inventory is a decision. In the running example, the security-update check under Doing a task showed that the storage server had been upgraded since the record was written:
storage-01   WRITE   master data
modify /hosts/storage-01/metadata/os
  before: Debian 12
  after:  Debian 13
Reason: /etc/os-release on the host reports Debian 13
The same mechanism adds a host that was found on the network and is missing
from the record, notes a newly installed service under expected_services,
or removes an entry for a machine that has been decommissioned. Over time the
inventory grows with the fleet instead of falling behind it, and the agent’s
own reasoning on the next task starts from a record it helped to keep right.
The learned allow list
Allow commands forever on a card is how the dashboard stops asking about
routine work. Wingman parses the command as Bash, extracts every program it
calls, and shows them in a preview: green for programs already learned, red
for new ones. Confirming the
preview stores the new ones in an allow list, separately for root and non-root
use.
A later command runs without a card when every program in it is either learned
or on a configured list that applies at the requested privilege level; the
history then names the rule combined-executables. A root command whose sudo
password is no longer cached still opens a card, to ask for the password, and a
command that uses a stored password always opens one.
Learning a program is a consequential choice, and the dashboard treats it as
one. A learned program may later receive any arguments and any redirection;
the permission applies to every host in the inventory; and interpreters such
as bash, python3 or perl ask for a second confirmation. The Allowlist
page lists every learned entry with a Revoke button, beside the read-only
rules from the configuration file. The following screenshot shows the
Allowlist page:
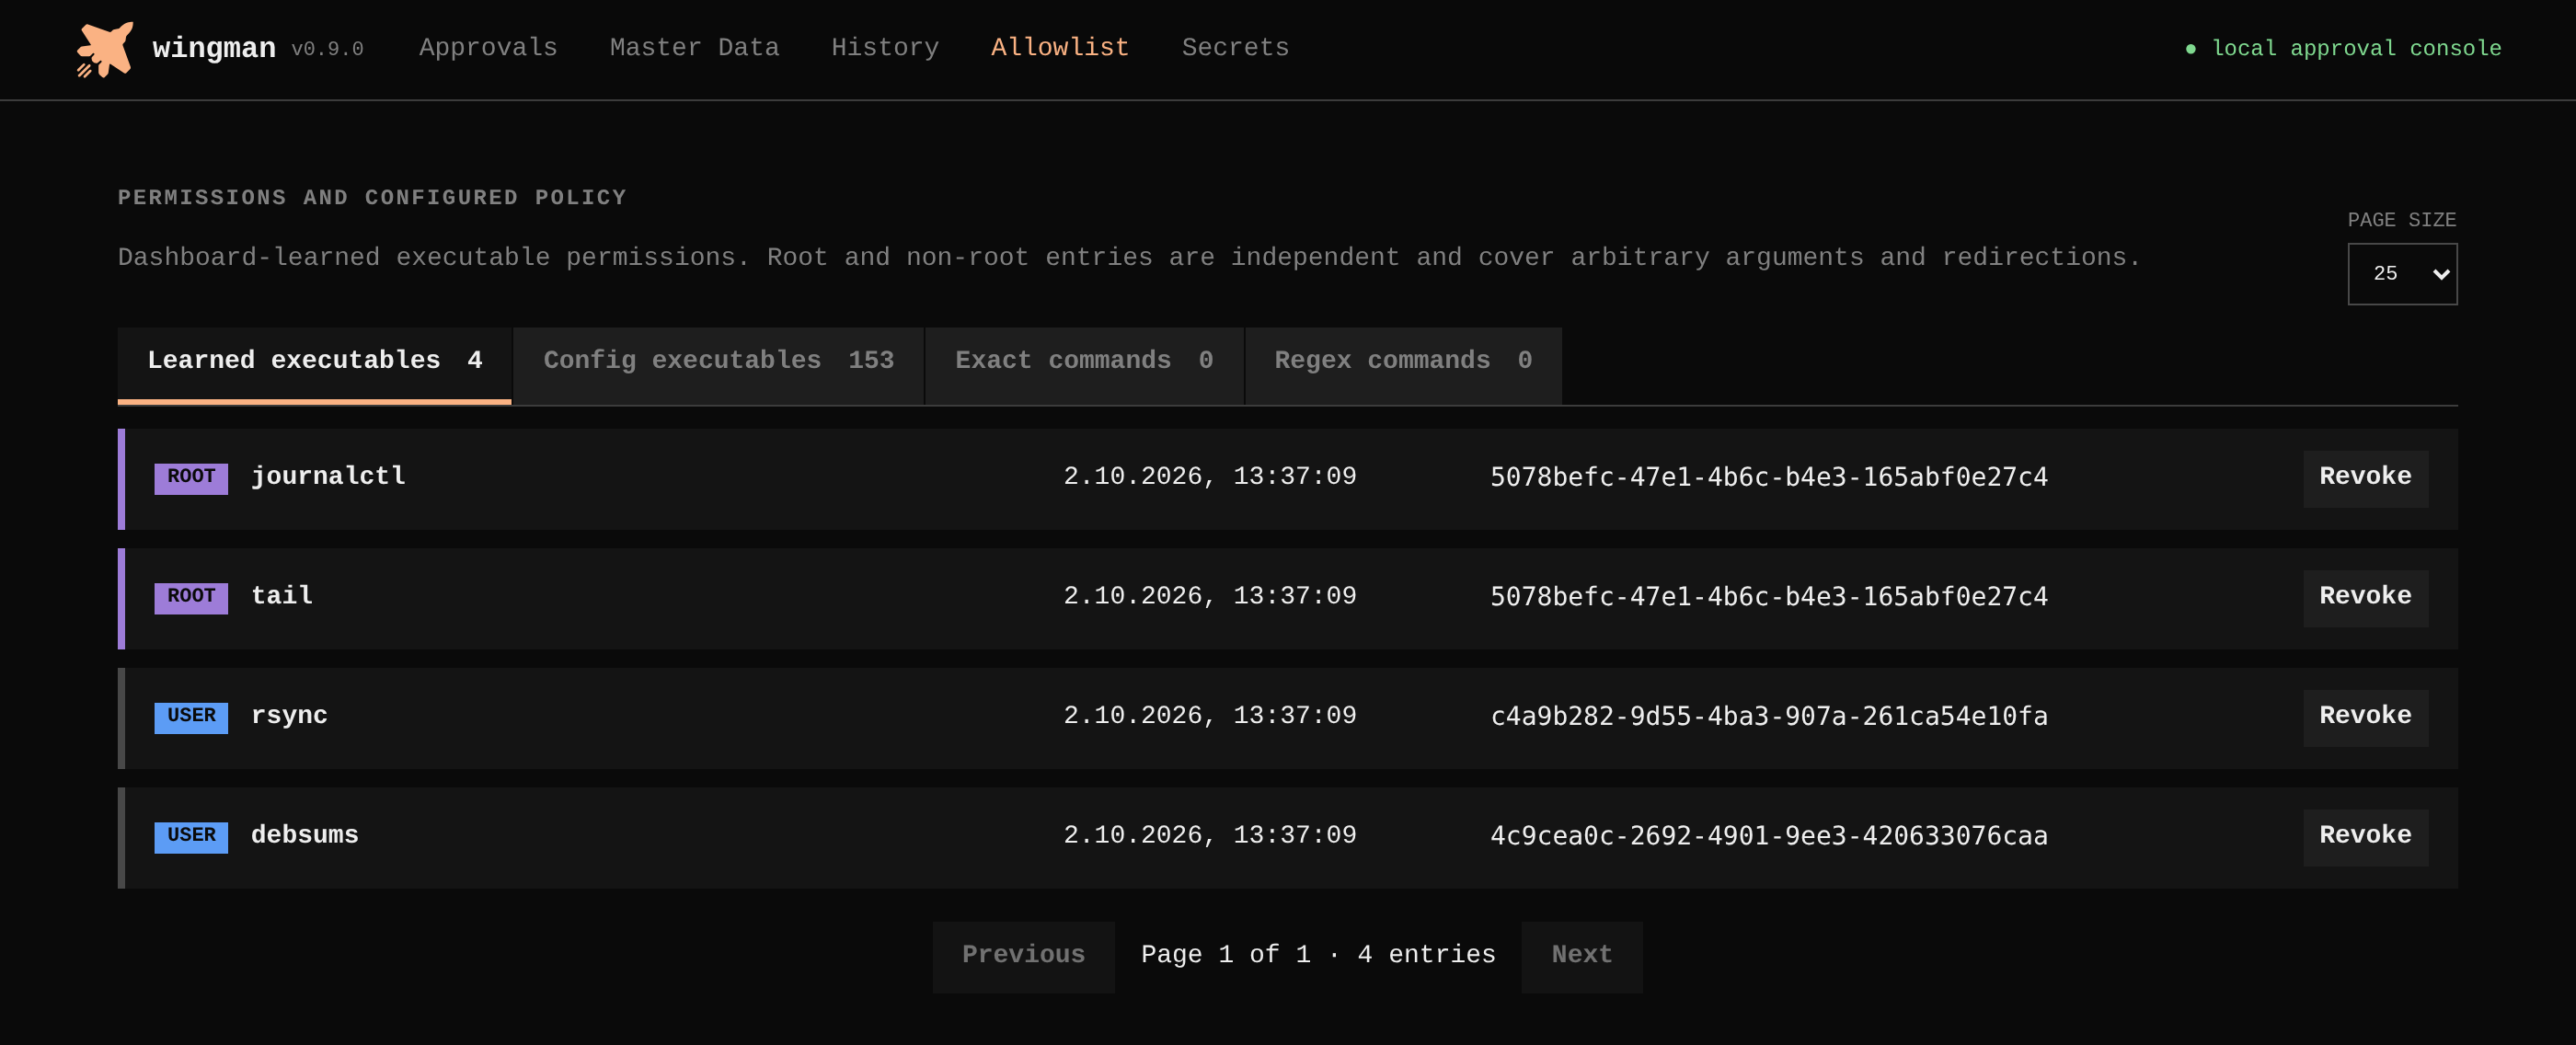 (enlarge)
References
- LANCET Nano: a small open model that classifies shell commands by risk (2026) · huggingface.co/fingerthief/lancet-nano